
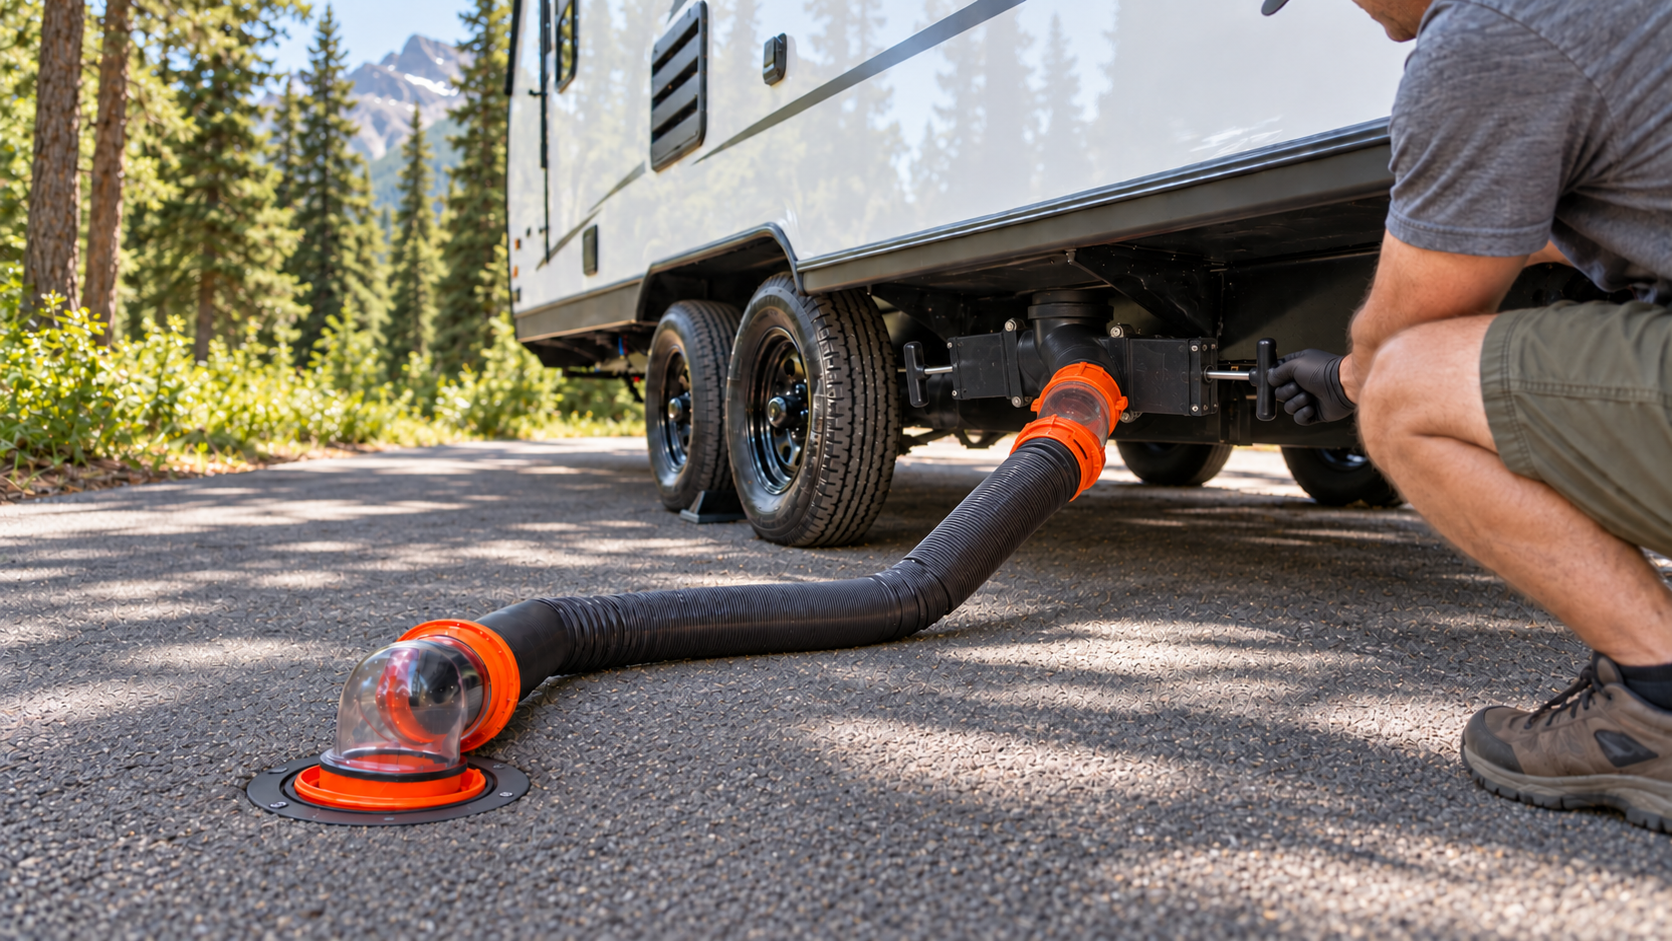
RV holding tank maintenance starts with understanding how the system works. Most RVs have two wastewater holding tanks. The black-water tank collects waste and water from the toilet, while the grey-water tank receives water from sinks and showers. Some smaller RVs combine these systems, and some larger models have more than one grey tank.
Both tanks drain through gate valves into a common sewer outlet. The larger valve usually controls the black tank, while the smaller valve controls the grey tank. Before operating either valve, securely connect the sewer hose at both ends.
Never release wastewater onto the ground. Empty holding tanks only into an approved campground sewer connection or dumping facility.
Essential Wastewater Equipment
Keep wastewater equipment separate from your fresh-water equipment. A basic kit should include:
- A durable RV sewer hose with secure bayonet fittings
- A transparent sewer elbow or short clear connector
- A threaded sewer-inlet adapter
- Disposable or washable waterproof gloves
- A dedicated non-potable water hose for tank flushing
- Sewer-hose supports where required
- Replacement valve seals and outlet caps
- Disinfectant or cleaning supplies for equipment and hands
Never use your drinking-water hose to rinse the sewer hose or flush a holding tank. Store potable-water and wastewater equipment in separate compartments whenever possible.
How to Empty RV Holding Tanks Safely
Park close enough to the sewer inlet that the hose reaches without stretching. The hose should slope toward the inlet without sharp bends or deep low spots.
Put on waterproof gloves before handling any wastewater equipment. Remove the sewer-outlet cap slowly and watch for trapped liquid. Connect the sewer hose securely to the RV outlet, then fasten the other end to the approved sewer inlet. Confirm that both ends are secure before opening a valve.
Empty the black tank first. Pull the black-tank valve fully open and allow the tank to drain completely. A transparent connector helps you see when the flow has stopped without exposing you to the contents.
Close the black-tank valve before opening the grey-tank valve. Drain the grey tank second so its soapy water helps rinse residue from the sewer hose. Once the flow stops, close the grey-tank valve completely.
Disconnect the hose from the RV carefully, keeping the outlet end raised so remaining liquid drains toward the sewer inlet. Rinse the hose with a dedicated non-potable hose where permitted. Replace the RV sewer cap, seal the sewer inlet, and store the equipment securely.
Wash or sanitize your hands after removing the gloves.
Wastewater Behind the Sewer Cap
Always wear waterproof gloves and remove the sewer-outlet cap slowly. Keep your face and body away from the opening, and be prepared to catch any liquid trapped behind the cap.
A small amount of residual wastewater does not necessarily indicate a problem. Liquid can remain in the drainpipe between the closed dump valves and the outlet cap, particularly when the RV has long plumbing runs. Cable-operated dump valves are often mounted farther from the outlet, creating more pipe in which residual liquid can collect.
If more than approximately one cup of wastewater repeatedly drains out when the cap is removed, inspect the system more closely. Debris may be preventing a valve blade from closing completely, the valve seals may be worn or damaged, or a cable-operated valve may not be travelling far enough to close fully.
Empty and rinse the tanks before inspecting the valves. Confirm that each handle or cable moves through its full range without binding. If wastewater continues collecting behind the cap, the affected valve or cable mechanism may require adjustment, cleaning, seal replacement, or professional service.
Black-Tank Care
The black tank needs enough liquid to move solid waste through the outlet. After dumping, add several gallons of water through the toilet so the bottom of the tank does not remain dry. Follow the RV manufacturer’s instructions and the directions supplied with any holding-tank treatment.
Use toilet paper labelled safe for RV or septic systems. You can test unfamiliar paper by placing a few sheets in a jar of water, shaking it, and checking whether it begins breaking apart quickly.
Only human waste and suitable toilet paper should enter the black tank. Never flush wipes, paper towels, feminine-hygiene products, diapers, grease, food, or household garbage—even when a product is advertised as flushable.
Avoid leaving the black-tank valve open while connected at a full-service campsite. Liquid can drain away while solids remain behind, eventually creating a hardened pile inside the tank. Keep the valve closed and dump when the tank is approximately two-thirds full or before travelling.
Flushing the Black Tank
If the RV has a built-in black-tank flush connection, connect only a dedicated non-potable hose. Confirm that the black-tank valve is open and the sewer hose is securely connected before turning on the flush water.
Never leave a tank-flushing system unattended. A closed valve, blocked vent, or forgotten connection can overfill the tank and force contaminated water into the RV.
Flush until the discharge runs substantially clearer, then shut off the water before disconnecting the flush hose. Allow the remaining water to drain and close the black-tank valve.
If the RV does not have a built-in flush system, follow the manufacturer’s approved cleaning method. Do not push rigid objects through the toilet or sewer outlet because they can damage the tank, seals, or plumbing.
Grey-Tank Care
Grey water contains soap, food particles, grease, hair, and other residue. Over time, these materials can create odours, coat tank sensors, and restrict drainage.
Wipe food scraps and grease from cookware before washing it. Use sink strainers to catch debris and clean shower-drain screens regularly. Avoid pouring cooking oil, harsh solvents, paint, or strong chemicals into the drains.
Like the black-tank valve, the grey-tank valve should normally remain closed at a full-service campsite. Keeping some water in the tank helps prevent residue from drying inside it and stops sewer gases from travelling through the plumbing if a drain trap becomes dry.
Preventing Holding-Tank Odours
Persistent odours usually indicate a maintenance or plumbing problem rather than a need for stronger chemicals. Common causes include:
- A dry sink or shower trap
- A dirty toilet-bowl seal
- A toilet seal that no longer holds water
- An open waste valve
- A blocked roof vent
- Loose or damaged plumbing
- Residue inside a holding tank
- A failed air-admittance valve beneath a sink
Keep a small amount of clean water in the toilet bowl so the seal blocks tank gases. Run water into infrequently used sinks and showers to refill their traps. Clean the toilet seal using products approved by the toilet manufacturer.
Use only holding-tank treatments intended for RV wastewater systems. Avoid mixing chemicals, and do not use products that may damage rubber seals or interfere with septic systems.
Cleaning Inaccurate Tank Sensors
Traditional holding-tank sensors can become coated with waste, soap film, grease, or mineral deposits. This often causes the monitor to show a partially full tank after dumping.
Begin by thoroughly emptying and rinsing the affected tank. Follow the RV or tank-treatment manufacturer’s approved cleaning procedure, then refill and drain the tank as directed. Several cleaning cycles may be needed if residue has built up over time.
An inaccurate monitor does not always mean the sensor has failed. However, damaged wiring, corroded connections, or defective sensors may require professional diagnosis.
Never rely only on the monitor panel. Learn the normal signs of a filling tank, such as changes in toilet flushing, slower shower drainage, or water beginning to rise in the lowest fixture.
Inspecting Valves and Connections
At the beginning of the season and periodically during use, inspect:
- Black- and grey-tank valve handles
- Valve stems and seals
- Sewer-outlet bayonet tabs
- Outlet cap and tether
- Exposed drainpipes and supports
- Sewer-hose fittings
- Tank-flush connections
- Plumbing beneath sinks and around the toilet
A valve that becomes difficult to operate should not be forced. Excessive force can bend the stem, break the handle, or damage the internal blade. Use only valve lubricants and maintenance methods approved for RV wastewater systems.
If liquid collects behind the sewer cap while both valves are closed, one of the gate valves may be leaking internally. Open the cap cautiously with the sewer hose positioned beneath it. Repair the valve before the leak worsens.
Troubleshooting Common Wastewater Problems
The tank drains slowly
Check the sewer hose for kinks, deep low spots, or an uphill run. Confirm that the tank contains enough liquid and that the gate valve opens completely. A persistent restriction may require professional cleaning or repair.
The valve is difficult to move
Do not pull harder or strike the handle. Dried residue, a damaged seal, corrosion, or a bent stem may be restricting the valve. Follow the manufacturer’s lubrication procedure or have the valve serviced.
The tank monitor shows a level after dumping
If the tank is empty but the monitor shows any level above empty, debris or residue is likely touching or bridging one or more of the internal sensors. The reading may show one-third, two-thirds, or full depending on which sensors are affected.
Thoroughly empty and rinse the tank, then use an approved sensor-cleaning treatment to remove material clinging to the tank walls and probes. More than one cleaning cycle may be required when residue has built up over time.
Wastewater leaks beneath the RV
Close the waste valves and stop using the affected fixtures. Determine whether the leak comes from the outlet cap, valve body, pipe connection, tank, or plumbing above it. Avoid travelling until loose or damaged drain plumbing has been secured.
The toilet bubbles when flushed
The black tank may be nearly full, or the roof vent may be restricted. Stop using the toilet until the tank level and venting system have been checked.
The shower will not drain
The grey tank may be full because the shower is often the lowest drain in the RV. Check the tank level and dump it at an approved facility before assuming the shower drain itself is blocked.
Cold-Weather and Winter Protection
Empty and rinse the black and grey tanks before freezing weather or seasonal storage. Close the waste valves and reinstall the sewer-outlet cap after draining.
Drain or protect tank-flush lines, macerator equipment, exterior wash connections, traps, valves, and other wastewater plumbing according to the RV manufacturer’s winterizing procedure. Use only non-toxic RV/marine plumbing antifreeze where required.
Do not leave ordinary water or unapproved chemicals trapped in wastewater components where they can freeze. Ice can split fittings, damage valves, and crack exposed plumbing. For the complete cold-weather plumbing routine, see our How to Winterize an RV guide.
Routine Wastewater Maintenance Schedule
After each trip
- Empty the holding tanks as needed
- Rinse and inspect the sewer hose
- Store wastewater equipment clean and secure
- Check the sewer cap and fittings for damage
Monthly during regular use
- Inspect exposed valves and drain plumbing
- Clean drain strainers
- Check the toilet seal
- Confirm that tank vents and traps are working properly
At the beginning of each season
- Test both waste valves
- Inspect the toilet, drains, tank connections, and termination outlet
- Check the tank-monitor readings
- Replace damaged hoses, seals, or caps
At the end of the season
- Empty and rinse both tanks
- Clean and dry wastewater equipment
- Winterize the tanks and related plumbing as required
- Repair leaks before storage
For a printable version of the maintenance schedule, see our RV Checklists page.
When to Call a Professional
Arrange professional service if a holding tank is cracked, sagging, leaking, or pulling away from its supports. You should also seek help for inaccessible valve failures, persistent blockages, damaged drainpipes, recurring sewer odours, or wastewater leaking inside the RV.
Holding-tank repairs can involve hazardous contamination and confined spaces. Never attempt them without proper protective equipment and training. For more industry safety guidance, see the RV Safety & Education Foundation.