
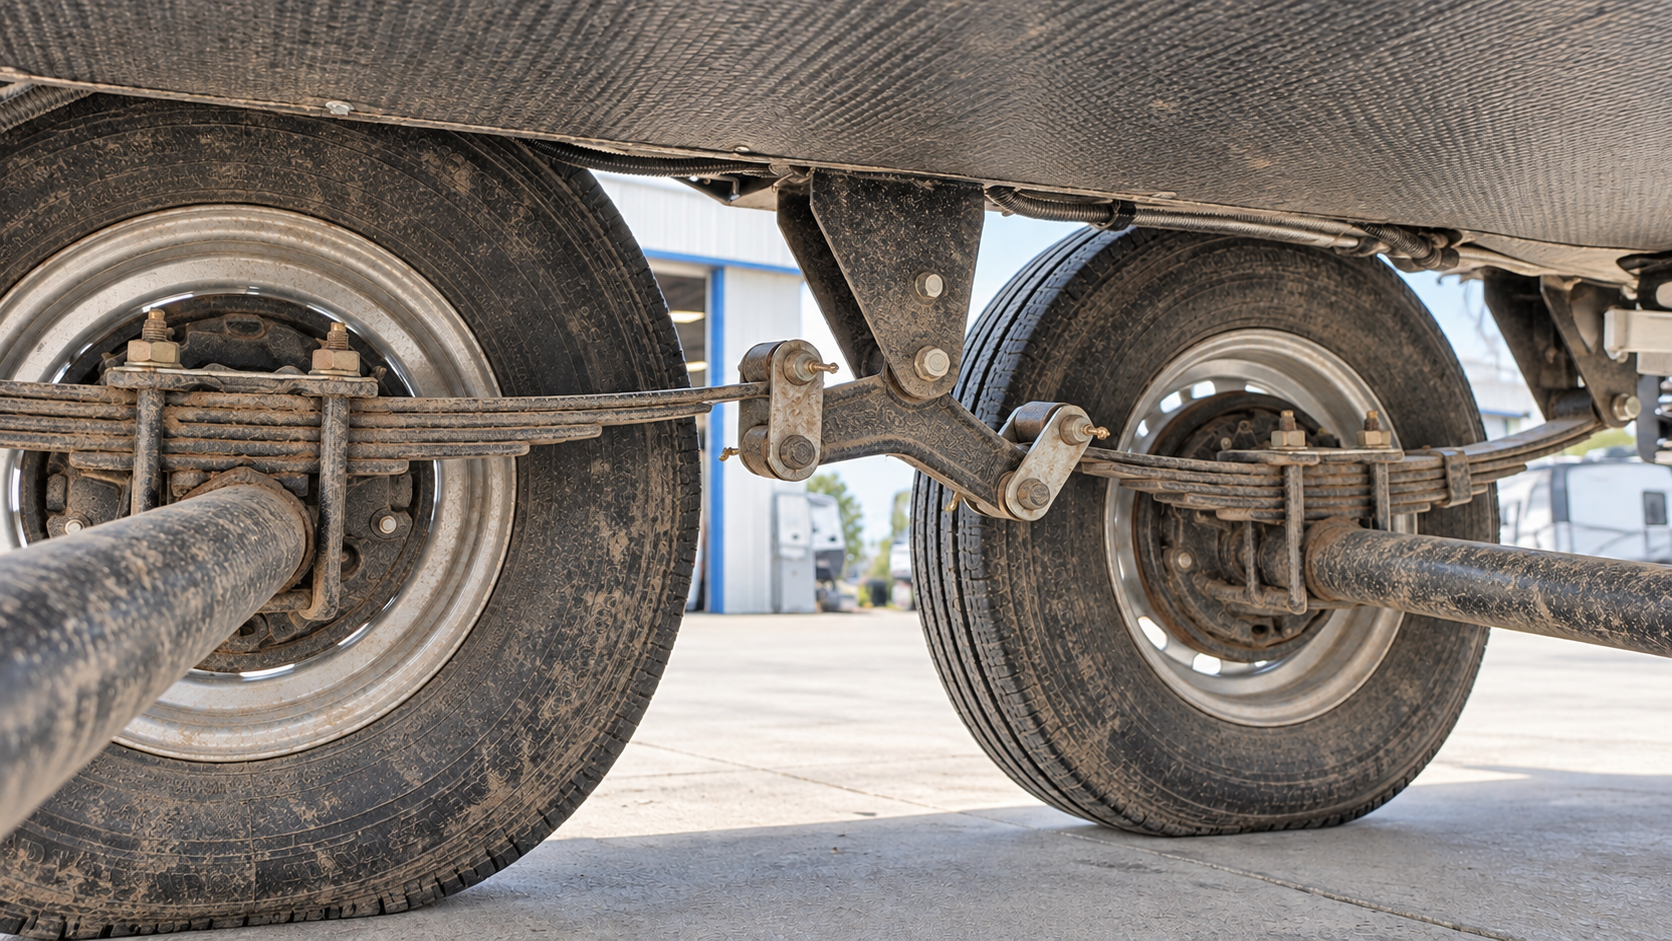
RV suspension maintenance matters because these components operate only a short distance above the road, where they endure vibration, potholes, water, dirt, road salt, and constantly changing loads. Despite the punishment they take, they are often ignored until a tire begins wearing unevenly, the trailer leans to one side, or a worn shackle finally breaks.
A visual suspension inspection should be part of routine RV maintenance. Finding a cracked spring, elongated shackle hole, loose U-bolt, or damaged hanger before a trip is far less disruptive than dealing with a failed suspension beside the highway.
This guide focuses on the leaf-spring suspension commonly installed on travel trailers and fifth wheels. Other suspension designs have different service requirements, so always follow the instructions for the components installed on your RV.
Understand the Main Suspension Components
A typical trailer leaf-spring suspension includes:
- Leaf springs
- Spring eyes
- Spring-eye bushings
- Shackle plates
- Suspension bolts
- Equalizers
- Spring hangers
- Axle seats
- U-bolts
- Tie plates
- Axle tubes
Single-axle trailers normally have one leaf spring on each side. One end of each spring attaches to a fixed hanger, while the other connects to a movable shackle or spring hanger arrangement that allows the spring to change length as it flexes.
Tandem-axle trailers usually have an equalizer between the two springs on each side. The equalizer pivots as the axles move over uneven surfaces and helps distribute movement between them.
Every pivot point creates an area where bolts, bushings, shackles, and equalizers can wear.
Inspect the Suspension Safely
Park the RV on firm, level ground before inspecting the suspension. Chock the wheels securely and keep the tow vehicle connected if the manufacturer recommends it for stability.
Use a bright light and inspect from outside the trailer whenever possible. A camera or phone attached to an extension can help you see the inner sides of springs, hangers, and shackles without placing yourself underneath the RV.
Never crawl beneath an RV supported only by:
- A hydraulic jack
- An electric levelling jack
- Stabilizer jacks
- A tongue jack
- The tow vehicle’s suspension
Stabilizer jacks are designed to reduce movement. They are not necessarily rated to support the trailer for underbody work.
If the RV must be raised, follow the RV and axle manufacturers’ lifting instructions. Use equipment rated for the actual weight and support the trailer at approved frame locations. If those locations are unclear, have the inspection performed by a qualified RV or trailer technician.
Check the Trailer’s Ride Height and Stance
Begin the inspection by stepping back and looking at the RV from both sides and from the rear.
Look for:
- One side sitting lower than the other
- One corner sagging
- Different clearances above the tires
- An axle that appears shifted
- Tires sitting unusually close to the wheel opening
- A trailer that no longer sits level
- One wheel positioned differently within its wheel opening
- Changes in the distance between tandem tires
A difference in ride height can result from uneven loading, low tire pressure, a weak or broken spring, worn bushings, a damaged equalizer, shifted axle components, or frame damage.
Confirm that the RV is parked on level ground and that tire pressures are correct before assuming the suspension has failed.
Inspect the Leaf Springs
Leaf springs are made from multiple curved steel leaves clamped together into a spring pack. They support the trailer and flex as the axles move.
Inspect each spring for:
- Cracked or broken leaves
- A missing section of a leaf
- A spring pack that has shifted sideways
- Separated or fanned-out leaves
- Broken spring clamps
- Heavy rust scaling
- Impact damage
- A flattened or reversed arch
- Contact between the spring and another component
- Unequal spring shapes from one side to the other
Surface rust is common, but deep scaling, cracks, or significant loss of material requires professional evaluation.
A broken inner leaf may be difficult to see because the surrounding leaves can hold it in place. Examine both ends and the centre of the spring pack carefully.
Do not weld, heat, bend, or straighten a damaged leaf spring. Replace it with a correctly rated spring that matches the suspension design. For more on tire inspection and replacement, see our RV Tire Safety guide.
Watch for Flattened or Overloaded Springs
A leaf spring changes shape as weight is added. However, a spring that remains unusually flat, curves in the wrong direction, or provides inadequate clearance may be overloaded, weakened, or damaged.
Check for contact between:
- Tires and wheel wells
- Axle tubes and the frame
- Equalizers and their travel limits
- Springs and frame components
- Suspension bolts and surrounding metal
Repeated suspension contact can leave polished metal, chipped paint, bent components, or impact marks.
Weakened springs should not simply be replaced with much stiffer springs without investigating the cause. The trailer may be overloaded, poorly balanced, or fitted with incorrect components. Increasing spring capacity does not increase the RV’s axle, frame, tire, or gross vehicle weight ratings.
Inspect the Spring Hangers
Spring hangers are welded to the trailer frame and provide the main suspension attachment points.
Inspect each hanger for:
- Cracks around the welds
- Bent side plates
- Elongated bolt holes
- Missing weld material
- Rust developing from a crack
- Movement between the hanger and frame
- Contact marks from a spring or shackle
- A hanger leaning to one side
Use a light and examine both sides of every hanger. Small cracks can hide beneath dirt, undercoating, or surface rust.
Cracks around suspension hangers or frame members require professional attention. Continuing to tow can allow the hanger to separate from the frame or alter axle alignment.
Do not cover a suspicious crack with sealant, undercoating, or paint before it has been inspected.
Check the Shackle Plates
Shackle plates connect the spring eyes to the equalizer or rear hanger while allowing the suspension to move.
Thin original-equipment shackles can wear around their bolt holes. As the holes enlarge, the shackles may tilt, clunk, or eventually break.
Inspect for:
- Elongated or egg-shaped holes
- Cracks
- Bent shackle plates
- Missing nuts
- Uneven plate angles
- Metal dust around the bolts
- Contact with the frame
- Plates that are visibly thinner around the holes
- One shackle hanging differently from the others
A badly worn shackle can allow the axle to shift or the spring to drop. Replace worn components before further travel.
Both plates at a connection should be inspected. The inner plate may be harder to see and can wear as severely as the outer plate.
Inspect Suspension Bolts and Bushings
Suspension bolts pass through bushings installed in the spring eyes and equalizer.
Many standard suspensions use plastic or nylon bushings. These can wear until the bolt begins contacting the spring eye or equalizer directly. Upgraded systems may use bronze bushings with greasable bolts.
Possible signs of worn bushings include:
- Side-to-side spring movement
- Clunking over bumps
- Rust or metal dust around a pivot
- Off-centre bolts
- Elongated spring-eye holes
- Uneven shackle positions
- Grease contaminated with metal particles
- Excessive movement during inspection
Wear cannot always be confirmed from the outside. A complete inspection may require unloading the suspension and removing the bolts.
Suspension bolts may use locking nuts or splined sections that prevent rotation. They must be installed and tightened according to the component manufacturer’s instructions. Overtightening can prevent the suspension from pivoting, while insufficient tightening can allow damaging movement.
Understand Wet Bolts
A wet bolt is a suspension bolt with an internal grease passage and an external grease fitting. It allows grease to reach a compatible bushing without removing the bolt.
Wet bolts are often used with bronze bushings and heavier shackle plates as part of an upgraded suspension kit.
The presence of grease fittings does not guarantee that grease is reaching every bushing. A grease passage can become blocked, or the outlet hole may be positioned against a loaded section of the bushing.
Follow the suspension manufacturer’s lubrication instructions. Use the specified grease and service interval.
When greasing wet bolts:
- Clean the fitting before attaching the grease gun
- Use the recommended grease
- Apply grease slowly
- Watch for grease appearing at the bushing
- Stop if pressure becomes excessive
- Wipe away excess grease
- Check that the fitting remains secure
Do not force grease into a fitting that refuses to accept it. Excessive pressure can damage the fitting or grease-gun hose. The suspension may need to be safely unloaded or the bolt removed and inspected by a technician.
Inspect the Equalizers
On a tandem-axle suspension, the equalizer pivots between the front and rear springs.
Inspect both equalizers for:
- Cracks
- Bent metal
- Worn or elongated holes
- Damaged bushings
- Contact with the hanger
- Unequal angles from side to side
- A pivot bolt that has shifted
- Missing hardware
- Excessive rust or metal loss
- Restricted movement
Some upgraded equalizers contain rubber cushioning. Inspect the rubber for cracking, separation, bulging, or distortion according to the manufacturer’s instructions.
The equalizer angles may change with loading and uneven ground. Compare both sides only when the trailer is parked level and loaded normally.
An equalizer that sits against its travel limit can indicate improper spring length, worn components, incorrect ride height, overloading, or suspension damage.
Examine the U-Bolts and Tie Plates
U-bolts clamp the axle to the leaf spring and tie plate. These fasteners are critical because they help maintain the axle’s position beneath the trailer.
Look for:
- Loose or missing nuts
- Rust trails around the nuts
- Polished areas that suggest movement
- Bent U-bolts
- Uneven thread exposure
- Cracked or distorted tie plates
- A shifted axle seat
- Gaps between clamped components
- Evidence that the axle has moved on the spring
Do not test U-bolt tightness casually with a standard wrench. U-bolts require a specific torque value and tightening pattern based on their size, material, axle, and suspension design.
Under-tightening can allow the axle to move. Overtightening can stretch the U-bolt, distort components, or damage the axle tube.
If a U-bolt is loose or the axle has shifted, stop towing and have the assembly inspected. U-bolts may require replacement rather than reuse after they have been loosened or stretched.
Inspect the Axle Tubes
Look along each axle tube for:
- Impact damage
- Deep rust
- Cracks
- Damaged welds
- Leaking brake wiring
- A visibly bent or distorted tube
- Evidence that the axle has shifted
- Contact with the frame or underbody
Trailer axles may be manufactured with a slight upward curve or camber. This intentional shape should not be mistaken for damage.
A wheel leaning noticeably, unusual tire wear, or a trailer tracking poorly may indicate a bent axle, damaged spindle, bearing problem, overloaded suspension, or alignment issue.
Axle alignment and bending should be evaluated with proper measuring equipment.
Read the Tire-Wear Pattern
Tire wear can provide clues about suspension or alignment problems.
Watch for:
- More wear on one edge
- Cupping or scalloping
- One tire wearing faster than the others
- Scrubbing across the tread
- Different wear patterns on the same axle
- Contact marks on the tire sidewall
- Damage inside the wheel well
Uneven tire wear can also result from incorrect inflation, overloading, bent wheels, bearing problems, brake issues, tire defects, or frequent tight turns.
Do not replace a damaged tire without investigating why it wore abnormally. The same problem can quickly damage the replacement.
Listen for Suspension Noise
Some suspension noise is normal, especially from dry steel components. New or worsening sounds deserve attention.
Possible warning sounds include:
- Clunking
- Popping
- Grinding
- Squeaking
- Metallic knocking
- Repeated banging over small bumps
Noise can come from worn bushings, loose bolts, dry pivots, damaged equalizers, shifted springs, loose U-bolts, or contact between components.
Do not spray general-purpose lubricant over the suspension in an attempt to silence it. Petroleum products can damage some rubber components, attract dirt, or conceal the location of the problem. Lubricate only the points and materials approved by the manufacturer.
Check Suspension Clearance
Adequate clearance allows the suspension to move without the tires or axles striking the RV.
Inspect clearance between:
- Tires and wheel wells
- Tires and neighbouring tires
- Tires and slide-out mechanisms
- Axles and frame
- Springs and plumbing
- Shackles and frame components
- Equalizers and hangers
- Brake wiring and moving parts
Look for rubbed paint, shiny metal, damaged insulation, crushed plumbing, or polished areas around the tires.
Clearance measured while the RV is empty may decrease significantly when the trailer is loaded. Use actual travel loading when evaluating ride height and clearance.
Consider How Weight Affects the Suspension
An overloaded or poorly balanced RV places extra stress on springs, tires, bearings, axles, shackles, and frame attachments.
Do not rely only on the trailer’s published empty weight. Water, propane, batteries, food, tools, accessories, cargo, and aftermarket equipment all add weight.
Weigh the loaded RV at a suitable scale and compare the results with:
- Gross vehicle weight rating
- Gross axle weight ratings
- Tire load capacities
- Wheel ratings
- Hitch or pin-weight limits
Side-to-side loading also matters. A trailer may remain below its total weight rating while one wheel, tire, spring, or side of an axle carries too much weight.
Redistribute cargo when possible and correct the cause of an overloaded component. For more on weight ratings and loading, see our RV Weight, Loading and Towing Safety guide.
Inspect After a Road Impact
Perform an additional suspension inspection after:
- Striking a deep pothole
- Hitting a curb
- Travelling over severe washboard roads
- Driving through heavy road debris
- Experiencing a tire failure
- Hearing an unexpected impact
- Discovering sudden tire wear
- Seeing the trailer begin to track differently
A severe impact can bend a wheel, shift an axle, damage a spring, loosen clamping hardware, or crack a hanger.
If the trailer pulls, dog-tracks, leans, or handles differently after an impact, have the running gear inspected before continuing at highway speed.
RV Suspension Maintenance: Schedule
Inspect the visible suspension:
- Before the beginning of each travel season
- Before a long trip
- After a severe road impact
- When unusual tire wear appears
- When the trailer begins leaning
- When new suspension noise develops
- At the intervals specified by the axle and suspension manufacturers
Lubricate wet bolts and other serviceable components according to their manufacturer’s schedule.
A more thorough inspection may require unloading the suspension and checking internal bushings, bolt wear, and component movement. This is a good time to combine suspension service with wheel-bearing and brake maintenance.
Record the date, mileage, findings, and parts replaced. Photographs can help you compare spring shape, shackle position, corrosion, and tire wear over time.
Suspension Inspection Checklist
Before towing, confirm that:
- Leaf springs have no visible cracks or broken leaves
- Spring packs have not shifted
- Spring clamps remain intact
- Shackle plates are not bent or worn through
- Suspension bolts and nuts are present
- Equalizers are not cracked or contacting their limits
- Spring hangers and welds show no cracks
- U-bolts and tie plates show no signs of movement
- Axles appear correctly positioned
- Brake wiring is secured away from moving parts
- Tires have adequate clearance
- Tire wear is even
- The trailer sits normally when loaded
- Wet bolts have been serviced as required
- No fresh metal dust, polished contact points, or impact marks are visible
If anything has changed since the previous inspection, determine why before travelling.
When to Call a Professional
Stop towing and arrange professional inspection if you find:
- A cracked or broken leaf spring
- A missing suspension bolt
- A broken shackle
- A loose or shifted axle
- A cracked spring hanger
- Damaged frame welds
- A bent equalizer
- A loose U-bolt
- Severe bushing wear
- Tires contacting the RV
- A wheel sitting at an abnormal angle
- Sudden or severe tire wear
- A trailer leaning noticeably
- Evidence that an axle has moved
- Any component close to separating
Suspension repairs often require the trailer to be raised and supported while springs and axles remain under load. Incorrect support placement or uncontrolled spring tension can cause serious injury.
Use a qualified RV or trailer technician when the work exceeds a visual owner inspection. For help identifying specific problems, see our RV Troubleshooting guides. For more industry safety guidance, see the RV Safety & Education Foundation.
RV Suspension Maintenance: Key Takeaways
RV suspension components wear gradually, but their failure can happen suddenly. Leaf springs, shackles, bushings, equalizers, hangers, and U-bolts should not be treated as lifetime parts.
Regular visual inspections can reveal shifting metal, elongated holes, cracked welds, unusual rust, reduced clearance, and abnormal tire wear before a component fails on the road.
Look at the suspension whenever you inspect the tires and brakes. The few minutes spent checking underneath the RV can prevent tire damage, axle movement, structural repairs, and an unsafe roadside breakdown.