
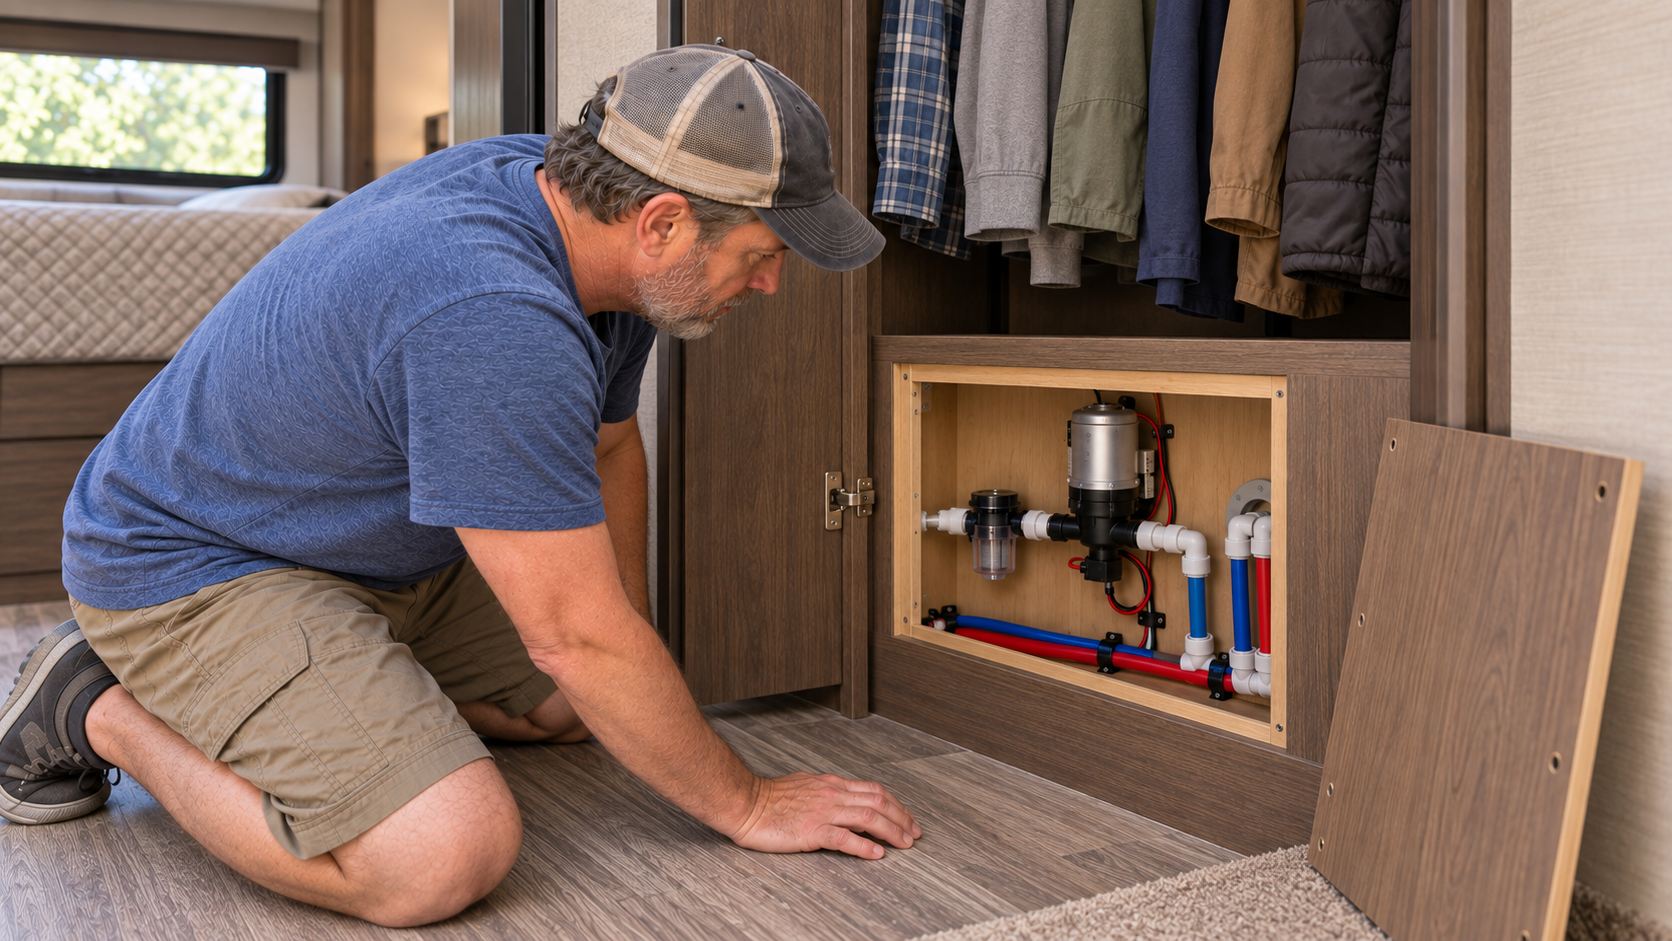
The RV water pump draws water from the fresh-water tank and pressurizes the plumbing system whenever the RV is not connected to city water. RV water pump maintenance keeps that system reliable. When everything works correctly, the pump starts after a faucet opens and stops shortly after the faucet closes.
A pump that runs continuously, cycles when nobody is using water, produces weak pressure, or fails to start is usually pointing to a problem somewhere in the water supply, plumbing, electrical circuit, inlet strainer, or pump itself.
Most RV owners can inspect connections, clean the pump strainer, check the fuse, prime the system, and look for leaks. Internal pump repairs, damaged wiring, inaccessible plumbing leaks, and pressure adjustments may require a qualified RV technician.
Identify the Water Pump
Find the pump before a problem occurs. RV manufacturers commonly install water pumps:
- Near the fresh-water tank
- Beneath a kitchen cabinet
- Under a bed or dinette seat
- Behind a removable interior panel
- Inside a basement storage compartment
- Near the water-management panel
Record the pump manufacturer, model number, voltage, flow rating, pressure setting, fuse size, and replacement-part numbers. Photograph its label and plumbing connections before removing anything.
Most RV fresh-water pumps operate on 12-volt DC power and use a pressure switch to control operation. Opening a faucet lowers system pressure and starts the pump. Closing the faucet allows pressure to build until the switch turns the pump off.
Some RVs use variable-speed pumps or have an accumulator tank, so their operating sounds and cycling patterns may differ. Follow the instructions for the equipment installed in your RV.
Understand When the Pump Is Needed
The water pump is normally used only when drawing water from the onboard fresh-water tank.
When the RV is connected to a pressurized city-water source, the external supply pressurizes the plumbing system. The water pump is normally turned off because it is not needed.
Before switching on the pump:
- Confirm that the fresh-water tank contains water
- Disconnect the city-water supply
- Check the water-management valves
- Confirm that the winterizing valve is in its normal position
- Make sure the fresh-tank drain is closed
- Check that the pump inlet and outlet connections are secure
- Open a faucet when priming an empty system
Do not assume every pump can run dry without damage. Avoid operating the pump with an empty fresh-water tank unless its manufacturer specifically permits it.
Inspect the Pump and Plumbing
Turn off the pump before inspecting it. If you plan to disconnect the strainer or a water line, relieve system pressure by opening a faucet and place a towel beneath the pump.
Look for:
- Water around the pump
- Loose threaded connections
- Damaged fittings
- Cracked hoses or PEX tubing
- Kinked inlet lines
- Corroded electrical terminals
- Loose mounting screws
- Damaged rubber mounting feet
- Debris inside the clear inlet strainer
- Signs of winter freeze damage
- Plumbing rubbing against cabinets or the RV floor
The flexible section of hose near the pump helps isolate vibration. Replacing it with a rigid or incorrectly supported connection can make pump noise travel through the RV.
Do not overtighten plastic pump fittings. Excessive force can crack the fitting, strainer, or pump housing.
Clean the Water-Pump Strainer
Many RV water pumps have a small strainer installed on the inlet side. Its screen catches debris before it enters the pump.
A restricted strainer may cause:
- Weak water pressure
- Reduced flow
- Pump noise
- Difficulty priming
- Longer pump run time
- Irregular cycling
To inspect the strainer:
- Turn off the water pump.
- Disconnect the city-water supply.
- Open a faucet to relieve pressure.
- Place a towel beneath the strainer.
- Remove the clear strainer bowl according to its instructions.
- Remove and rinse the screen with clean water.
- Inspect the bowl, screen and sealing ring for damage.
- Reassemble the strainer without overtightening it.
- Restore water and check carefully for leaks.
A missing, damaged or incorrectly seated sealing ring can allow the pump to draw air without producing an obvious water leak.
If the strainer repeatedly fills with debris, inspect and clean the fresh-water tank as appropriate. Do not continue allowing sediment to reach the pump.
Prime the Water System
A pump may need to be primed after the fresh-water tank has been drained, the RV has been winterized, the strainer has been serviced, or an inlet connection has been opened.
A general priming procedure is:
- Add enough potable water to the fresh-water tank.
- Confirm that the tank drain is closed.
- Place the water-management and winterizing valves in their normal-use positions.
- Turn the water heater bypass valves to the appropriate position.
- Open a cold-water faucet.
- Turn on the water pump.
- Allow air to escape until water flows steadily.
- Repeat at the remaining cold and hot faucets.
- Close each faucet and confirm that the pump stops.
Do not let the pump run indefinitely without water. If it does not begin drawing water within the time permitted by its manufacturer, turn it off and investigate the inlet side.
The Pump Does Not Run
If the pump makes no sound when switched on, begin with the 12-volt electrical supply.
Check:
- The RV battery state of charge
- The battery-disconnect switch
- The water-pump switch
- The applicable 12-volt fuse
- The pump-control panel
- Accessible wiring connections
- Ground connections
- Additional pump switches in the bathroom or exterior compartment
Some RVs use several water-pump switches connected to a controller. A lit switch does not always prove that power is reaching the pump.
Replace a blown fuse only with the correct type and rating. If the new fuse blows, stop replacing it. A short circuit, damaged motor, seized pump or incorrect wiring may require professional diagnosis.
If power and ground reach the pump but it does not operate, the motor, pressure switch or internal pump mechanism may have failed. For more on 12-volt systems and battery care, see our Understanding RV Electrical Systems guide.
The Pump Runs but No Water Comes Out
A pump that runs without delivering water may be unable to draw from the fresh-water tank.
Possible causes include:
- An empty fresh-water tank
- Incorrect water-management valve positions
- An open winterizing valve
- A loose inlet fitting
- A damaged strainer seal
- A clogged inlet strainer
- A kinked or collapsed inlet hose
- A blocked tank outlet
- Air entering the suction line
- A pump mounted too far from the tank
- A damaged internal pump valve
- A frozen or obstructed water line
Check the tank level rather than relying entirely on the monitor panel. Tank sensors can provide inaccurate readings.
Inspect the inlet side carefully. Because it operates under suction, a loose connection may draw air without dripping water. Even a small air leak can prevent the pump from priming.
The Pump Runs Continuously
The pump should stop after all faucets are closed and the plumbing reaches its shutoff pressure.
If it continues running, check for:
- An open faucet or exterior shower
- A leaking toilet valve
- A dripping low-point drain
- A leaking water-heater drain
- A loose plumbing connection
- A damaged pump strainer or seal
- Air entering the pump inlet
- Incorrect valve positions
- A leak beneath the RV
- A cracked pipe or fitting
- A failed pressure switch
- Worn internal pump components
Turn the pump off while searching for the problem. Continuous operation can drain the battery, waste fresh water and worsen an existing leak.
If the system has recently been drained, the pump may run longer while refilling the water heater and removing air. Confirm that the conventional water-heater tank is full before energizing its propane burner or electric heating element.
The Pump Starts When Nobody Is Using Water
A pump that starts briefly when all fixtures are closed is restoring pressure that has escaped somewhere.
Possible causes include:
- A dripping faucet
- A leaking toilet valve
- A loose fitting
- A small plumbing leak
- A water-heater pressure loss
- A leaking exterior shower
- A low-point drain that is not fully closed
- A check-valve problem
- A pressure-switch problem
- Internal leakage through the pump
Listen for the pump and inspect the RV systematically. Check cabinets, storage compartments, the toilet, shower, water heater, exterior fixtures and the area beneath the RV.
Do not ignore occasional unexplained cycling. A small hidden leak can damage flooring, cabinets, insulation and wall materials before water becomes visible.
The Pump Cycles Rapidly
Rapid cycling means the pump repeatedly turns on and off while a faucet is open.
This may be caused by:
- Very low water flow at the fixture
- A restricted faucet aerator
- A clogged showerhead
- A dirty pump strainer
- A kinked water line
- Air in the system
- Incorrect pressure-switch operation
- A water-saving fixture with insufficient flow
- A missing, waterlogged or incorrectly charged accumulator tank
- A pump that is oversized for the plumbing system
Clean fixture aerators and the pump strainer before assuming the pump is defective. Open another faucet and compare its operation.
Do not adjust the pump pressure switch unless the manufacturer provides an approved procedure. Incorrect adjustment can cause leaks, excessive pressure, pump damage or continuous operation.
Water Pressure Is Weak
Weak pressure at every fixture may point to the pump, strainer, tank supply or main plumbing. Weak pressure at only one fixture is more likely to involve that faucet, showerhead or local water line.
Check:
- Fresh-water tank level
- Battery voltage
- Pump strainer
- Inlet hose for kinks
- Valve positions
- Faucet aerators
- Showerhead openings
- Plumbing restrictions
- Pump flow rating
- Leaks allowing pressure to escape
Low battery voltage can slow a 12-volt pump. If the pump improves when the battery is fully charged, inspect the battery condition, charging system and electrical connections.
Mineral deposits can restrict aerators and showerheads. Clean these components using products permitted by their manufacturers.
The Pump Is Noisy
RV water pumps normally produce some vibration, but excessive noise can indicate an installation or plumbing problem.
Inspect for:
- Loose mounting screws
- Missing or hardened rubber feet
- Plumbing touching the floor or cabinet
- Rigid tubing connected directly to the pump
- Air entering the inlet line
- A restricted strainer
- A kinked hose
- Loose interior panels
- Stored items vibrating against plumbing
Do not tighten mounting screws so firmly that the rubber isolators are compressed solid. The mounts need enough flexibility to absorb vibration.
Pipe insulation, approved flexible pump hoses and properly supported plumbing may reduce transmitted noise. Do not wrap the pump in insulation or block ventilation around its motor.
The Pump or Connections Leak
Turn the pump off immediately when a leak appears. Relieve pressure before touching the connection.
Determine whether the water comes from:
- A threaded inlet or outlet fitting
- The clear strainer bowl
- A damaged sealing ring
- A cracked pump housing
- A hose connection
- A PEX fitting
- The pump head
- A freeze-damaged component
Hand-tightened plastic fittings often require only the sealing method specified by the pump manufacturer. Do not automatically apply pipe tape or sealant to every connection; some fittings seal with an O-ring or cone-shaped surface.
A cracked housing, damaged pump head or recurring leak usually requires replacement parts or a new pump.
Protect the Pump During Winterizing
Water left inside the pump, strainer or connecting lines can freeze and crack components.
Follow the RV and pump manufacturers’ winterizing instructions. Depending on the system, the procedure may include:
- Draining the fresh-water tank
- Opening low-point drains
- Bypassing and draining the water heater
- Removing water from the pump strainer
- Using compressed air within the RV manufacturer’s pressure limit
- Pumping approved, non-toxic RV antifreeze through the plumbing
- Setting the winterizing valve correctly
Do not use automotive antifreeze in the fresh-water system. For the complete winterizing procedure, see our How to Winterize an RV guide.
During de-winterizing, flush the approved RV antifreeze from the plumbing, return all valves to their normal positions, inspect the pump and strainer, and check every connection for freeze damage. For the complete de-winterizing procedure, see our How to De-Winterize an RV guide.
RV Water Pump Maintenance: Checklist
Before Each Trip
- Add water to the fresh-water tank if needed
- Test the pump
- Confirm that the pump stops when fixtures close
- Check beneath the RV for leaks
- Inspect accessible plumbing connections
- Verify normal pressure at several fixtures
During the Camping Season
- Clean the pump strainer as needed
- Inspect flexible hoses
- Check mounting hardware and rubber feet
- Listen for unexplained cycling
- Look for moisture around the pump
- Check battery voltage if performance changes
Before Storage
- Empty or prepare the fresh-water system as required
- Clean the strainer
- Inspect the pump compartment
- Protect the system from freezing
- Turn off the pump
- Leave valves in the positions required by the winterizing procedure
For a printable version of the maintenance schedule, see our RV Checklists page.
When to Contact a Qualified Technician
Arrange professional service if:
- The pump has correct power and ground but will not operate
- A fuse repeatedly blows
- Wiring is overheated or damaged
- The pump housing is cracked
- The pressure switch requires adjustment or replacement
- The pump repeatedly loses prime
- A hidden plumbing leak cannot be located
- Water has damaged flooring, cabinets or insulation
- The system pressure is excessive
- A new pump must be matched to the RV’s plumbing
- The water-management system is incorrectly configured
- A leak involves inaccessible PEX fittings or concealed plumbing
A properly operating RV water pump should prime reliably, provide steady pressure, stop after fixtures close, and remain off when no water is being used. Regular strainer cleaning, leak inspections, correct valve positions and proper winterization can prevent most common pump problems. For help identifying specific problems, see our RV Troubleshooting guides. For more industry safety guidance, see the RV Safety & Education Foundation.